Custom Dimensions
Custom dimensions and their associated populators are documented in the following topics:
- Dimensions and Populators
- Custom Dimensions Page
- Custom Dimension Dialogs
- Dimension Dialogs UI
- Populator Settings Dialog
- Populator Fields
- Manage Custom Dimensions
- Manage Populators

Dimensions and Populators
Custom dimensions provide a mechanism by which Kentik customers can add a number of custom columns to your organization’s main tables in the Kentik Data Engine (see KDE Tables). Like Kentik-provided dimensions, a custom dimension may be used for group-by in a query (see Query Sidebar Controls) or as a filter in a filter group (see Filter Groups Interface).
You can create a custom dimension either manually or — using AWS tags — automatically. When a custom dimension is created manually, the user assigns a set of “populators” to that dimension; when created using AWS tags (key-value pairs), the populators are automatically generated.
As each flow record is ingested into a Kentik Data Engine main table (see KDE Tables), populators are used, like tags (see About Flow Tags), to evaluate the flow for a match with a specified value. Kentik tags and populators are distinct, however, in what happens when a match is found:
- With a tag, a match on a given row of incoming flow data results in the tag name being placed in either or both of two fields in that table row: the src_flow_tags column or the dst_flow_tags column.
- With a populator, a match on a given row of incoming flow data results in the value property defined in the populator itself being placed in that row's field for the custom column that corresponds to the custom dimension to which the populator was assigned.
Note: Unlike a tag, a populator is required to specify the direction of flow on which to match, which may be source, destination, or either.
Auto-Generated Dimensions
If your organization uses AWS or Azure tags, Kentik will use APIs to capture the keys of those tags and generate, in the tables of the KDE, a custom dimension column that corresponds to each key. The values associated with the keys in the AWS or Azure tags will automatically become populators in Kentik. To create a dimension using your tags, see Automatic Custom Dimensions.
Note: If you update any AWS or Azure tags from which you’ve generated custom dimensions, you will need to regenerate your populators in Kentik (see Regenerate Populators).
Dimension and Populator Limits
The table below shows the maximum number of dimensions and populators included with your subscription to a given edition of Kentik. The stated populator limits are customer-wide totals across all custom dimensions; there is no additional per-dimension limit.
| Platform Edition | Max Custom Dimensions | Max Populators | Max Populator Value Length |
| Pro | 4 | 5,000 | 128 characters |
| Premium | 10 | 25,000 | 128 characters |
Notes:
- Custom dimensions are not currently included in Kentik's Essentials edition (see Kentik Editions).
- Additional custom dimensions and populators beyond those included with a given edition are available for purchase; for further information, contact support@kentik.com.
- While up to 10,000 populators may be assigned to a given custom dimension, the field corresponding to that dimension in each row of the main table can store the value property of only a single matching populator.
Managing Dimensions and Populators
Custom dimensions and their associated populators may be managed (created, edited, and removed) in the portal (see Add a Custom Dimension) or via one of the following Kentik V5 APIs (manually created dimensions only; see About the V5 APIs):
- To manage individual custom dimensions and/or populators, see Custom Dimension API.
- To manage the populators of an existing custom dimension by batch, see Batch API.
Custom Dimensions Page
The Custom Dimensions page lists all of your organization’s custom dimensions. To view the Custom Dimensions page, choose Settings from the main Kentik navbar, then Custom Dimensions (under Data Enrichment). The Custom Dimensions page is documented in the following topics:
Note: While Member-level users can view this page, only Admin-level users can manage (create, edit, or remove) custom dimensions or populators.
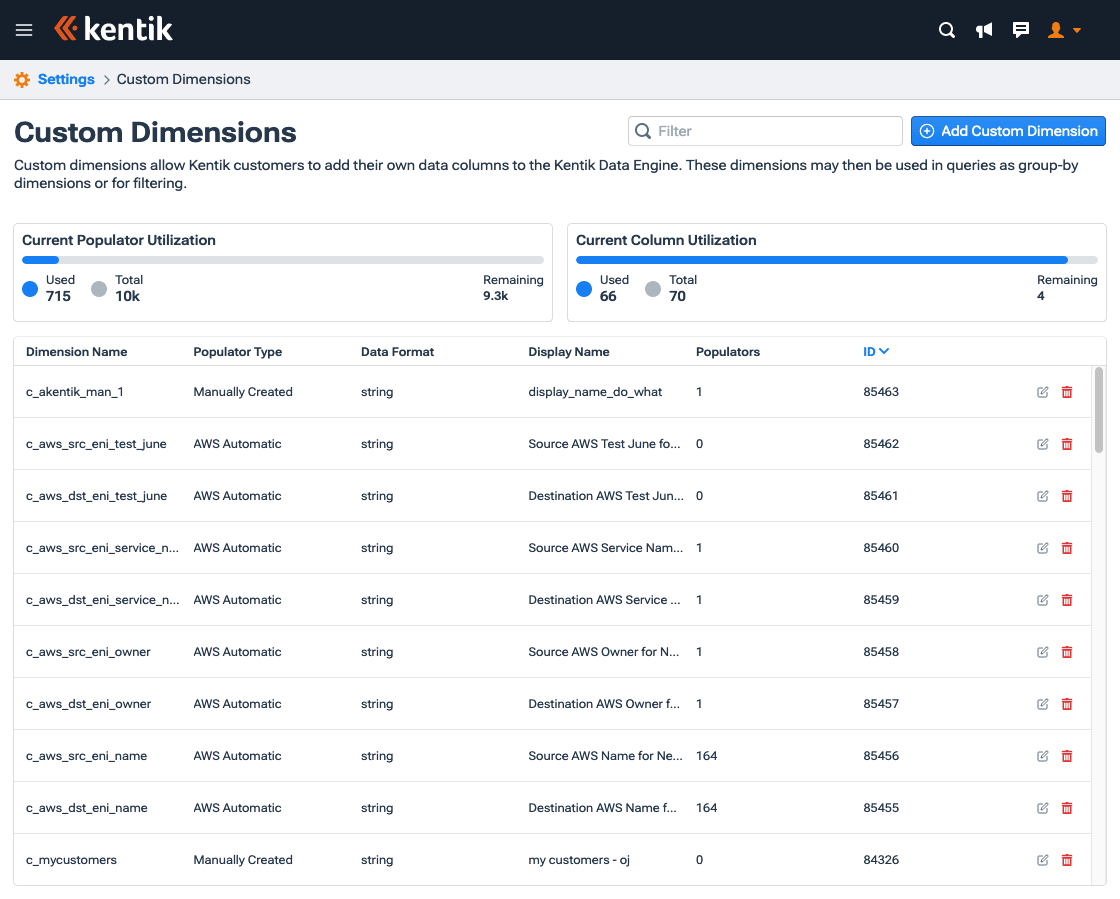
Custom Dimensions Page UI
The Custom Dimensions page has the following main UI elements:
- Filter: A field into which you can enter text to filter the Custom Dimensions List. The Dimension Name, Data Format, Display Name, and ID columns of the list are searched for a match on the string entered in this field.
- Add Custom Dimension: A button that opens the Create Custom Dimension dialog (see Add a Custom Dimension).
- Current Populator Utilization: A card that indicates your organization’s current usage of populators:
- Used: The number of populators currently in use by your organization.
- Total: The number of populators your organization has purchased.
- Remaining: The populators purchased by your organization but not currently in use. - Current Column Utilization: A card that indicates your organization’s current usage of custom KDE columns:
- Used: The number of columns currently in use by your organization.
- Total: The number of columns your organization has purchased.
- Remaining: The number of columns still available for use by your organization. - Custom Dimensions: A table listing your organization’s currently defined custom dimensions (see Custom Dimensions List).
Custom Dimensions List
The Custom Dimensions List is a table that lists all of your organization's existing custom dimensions. Click on a heading to sort the list (ascending or descending).
Each row in the list represents one custom dimension, which corresponds to one column in your organization’s main table in the Kentik Data Engine. The list provides the following information and actions for each custom dimension:
- Dimension Name: The name of the custom dimension as specified when it was created. Dimension names must begin with the prefix "c_" and contain only alphanumeric characters and underscores (no spaces).
- Populator Type: The origin of the dimension's populators:
- Manually Created: Created by a user in your organization.
- AWS Automatic: Generated automatically using AWS tags. - Data Format: The custom dimension type, either string or uint32 (unsigned 32-bit integer).
- Display Name: The name that will be displayed for the custom dimension in group by and filtering UI. Unlike the Dimension Name, the Display Name may contain spaces and is editable.
- Populators: The number of populators in the custom dimension.
- ID: The system-generated unique ID assigned when the custom dimension was created.
- Edit (icon): Opens the Custom Dimension dialog where admin users can review and edit settings for the custom dimension.
- Remove (icon): Opens a confirmation dialog that allows admin users to remove the custom dimension from the Custom Dimensions List and from the KDE.
Custom Dimension Dialogs
Adding or editing a custom dimension via the Kentik portal involves specifying information in the fields of the custom dimension admin dialogs. The dialog used for these settings depends on what you're trying to do:
- Create a manually populated dimension:
1. Open the Create Custom Dimension dialog from the Add Custom Dimension button.
2. Choose to populate your custom dimension manually, then click Next.
3. Fill out the fields to specify settings for the dimension, then Click Save. - Create an automatically populated dimension (AWS or Azure only):
1. Open the Create Custom Dimension dialog from the Add Custom Dimension button.
2. Choose the AWS or Azure radio button to populate your custom dimension automatically, then click Next.
3. Specify the AWS or Azure tags that should be used to populate the dimension. - Edit the properties of an existing dimension (manually or automatically populated):
1. Click the edit icon in the dimension's row in the Custom Dimensions List.
2. Edit dimension properties in the General tab of the Custom Dimension Dialogs. - Add/edit the populators of an existing dimension (manually-populated dimensions only):
1. Click the edit icon in the dimension's row in the Custom Dimensions List.
2. In the Populators tab of the Custom Dimension Dialogs:
- Add a populator: Click the Add Populator button, then use the resulting dialog to set values on which the new populator will match (see Populator Settings Dialog).
- Edit a populator: Click the Edit icon for the populator to edit, then use the resulting dialog to change the values on which the new populator will match.
Note: You can only add a populator after you’ve created a dimension.
Dimension Dialogs UI
The UI of the dialogs used for custom dimension settings is covered in the following topics:
- Common UI Elements
- Create Custom Dimension
- Edit Custom Dimension
- Dimension General Properties
- Dimension Populators Tab
- Populator List
Note:
- Custom dimension admin dialogs are accessible only to users whose level is Administrator.
- Manually created custom dimensions can also be added and edited with the Custom Dimension API.
Common UI Elements
The following UI elements are common across all dimension dialogs:
- Close: The X in the upper right corner closes the dialog and restores all elements to their values at the time the dialog was opened.
- Cancel: A button that closes the dialog and restores all elements to their values at the time the dialog was opened.
Create Custom Dimension
The Create Custom Dimension dialog is a wizard that appears when you click the Add Custom Dimension button on the Custom Dimensions page. The first step of the wizard is to select the type of dimension you'd like to create. Depending on the type, you'll then advance to additional steps in the wizard.
Select Dimension Type
The main content of this dialog is a set of radio buttons that you use to choose how you would like to populate the new custom dimension:
- Automatically using AWS tags: Create a custom dimension automatically using AWS tags.
- Automatically using Azure tags: Create a custom dimension automatically using Azure tags.
- Manually: Manually specify populators for the custom dimension.
After choosing the dimension type, click Next to continue to the next step.

Create Dimension Automatically
If you choose to create your custom dimension automatically using AWS or Azure tags (see Auto-Generated Dimensions) the next step in the wizard includes the following settings and controls:
- Entities: A list of all available AWS or Azure entities from which you can create a custom dimensions. Check the checkboxes for the entities you’d like to use.
- Back: Return to the previous step.
- Next: Continue to the final step in the wizard.

The final step of the wizard includes the following UI elements:
- Tags: A list of all available AWS or Azure tag keys from which you can create custom dimension columns. Check the checkboxes for the tags you’d like to use.
- Back: Return to the previous step.
- Save: Save your settings for the new dimension and exit the dialog.
Notes:
- If your organization is already using the maximum number of custom dimensions (see Dimension and Populator Limits), the Save button will be disabled.
- Kentik retrieves AWS metadata at an interval of 15 to 20 minutes, so if you just created the tag, you may need to wait a few minutes for it to appear as an available option in this dialog.
- It takes approximately 30 minutes to generate the data for the dimensions’ populators after creating the dimension.
Create Dimension Manually
The Create Manual Custom Dimension step appears when you choose to create your custom dimension manually. In addition to the UI elements described in Common UI Elements, the Create Manual Dimension step contains the following settings and controls:
- Dimension settings: Specify the properties of the dimension (see Dimension General Properties).
- Back: Return to the previous step.
- Save: Save your settings for the new dimension and exit the dialog.

Edit Custom Dimension
To edit an existing custom dimension you'll use the Custom Dimension dialog, which you access from the Custom Dimensions List by clicking the Edit icon (pencil) on the row of the dimension you’d like to edit.
In addition to the Common UI Elements, the Custom Dimension dialog features the following settings and controls:
- Tab selector: Select which tab is displayed:
- General tab (see Dimension General Properties): Contains fields for the properties of a custom dimension.
- Populators tab (see Dimension Populators Tab): Contains a list of populators. You can edit or delete populators for manually created custom dimensions from this tab.
Note: These tabs are shown only after creating a custom dimension and clicking the Add Custom Dimension button. When you click to edit the dimension, the two tabs will be visible. - Cancel: A button that cancels the edit dimension operation and exits the dialog. All elements will be restored to their values at the time the dialog was opened.
- Save: A button that saves settings for the edited dimension and exits the dialog.
Dimension General Properties
The general properties of a custom dimension may be specified in the following locations:
- New dimension: In the Create Custom Dimension dialog.
- Existing dimension: On the General tab of the Custom Dimension dialog.
General settings include the fields in the following table.
| Element | Create Custom Dimension Dialog | Custom Dimension Dialog | Description |
| Dimension name | Editable field | Read-only | The name of the custom dimension, which must start with “c_” and contain only alphanumeric characters and underscores. This is the name that will be used for the column that corresponds to the new dimension in the KDE Tables. |
| Type | Editable field | Read-only | The type of the custom dimension, chosen from the drop-down menu: string (default) or uint32. |
| Display name | Editable field | Editable field | The name that will be shown for the dimension in the Kentik portal (e.g. in the Query Sidebar Controls or the Filtering Pane). |
Dimension Populators Tab
The Populators tab of the Custom Dimension Dialogs is used to view a dimension's populators. This tab contains the following elements:
- Filter field: Enter text to filter the Populator List. The Value, Direction, and ID columns of the list are searched for a match on the string entered in this field.
- Add Populator (present only for manually generated dimensions): Opens the Add Populator dialog (see Populator Settings Dialog).
- Regenerate Populator (present only for automatically generated dimensions): Regenerates any data gathered from AWS tags. Use this button to generate your populators if anyone in your organization has added or edited any AWS tags since you created that specific dimension.
- Populator List: A list of the dimension's populators (see Populator List).

Populator List
The Populator List is a table on the Dimension Populators Tab that lists all of the populators defined for a given custom dimension. The table provides the following information and actions for each populator:
- [AdmDim-pop_list-orig.png provided]Value: The value placed in the custom column when there's a match with the ANDed populator parameters (see Populator Field Definitions).
- Direction: The direction (source, destination, or either) of the flow fields within which the populator will look for a match.
- ID: The system-generated unique ID assigned when the populator was created.
- Edit (pencil icon; present only for manually created dimensions): Opens the Populator dialog, where you can review and edit settings (see Edit a Populator).
- Remove (trash icon; present only for manually created dimensions): Opens a confirmation dialog that allows you to remove the populator.
Note: When a populator for a custom dimension is removed, the KDE main table rows that were previously matched by that populator will no longer be filterable by the populator's value.
Populator Settings Dialog
| Note: This topic applies only to manually-created dimensions. |
The Populator dialog is used to both add and edit a populator in a custom dimension. The dialog is accessed from the Custom Dimension dialog:
- To add a new populator, click the Add Populator button.
- To edit an existing populator, click the Edit icon in the populator's row of the Populator List.
The Populator dialog features the following UI elements:
- [AdmDim-populator_dialog-orig.png provided]Close button: Click the X in the upper right corner to close the dialog. All elements will be restored to their values at the time the dialog was opened.
- Tab selector: Selects which tab of the dialog is displayed. Each tab contains fields related to a category of populators (see Populator Field Definitions).
- Cancel: Click this button to cancel the add populator or edit populator operation and exit the dialog. All elements will be restored to their values at the time the dialog was opened.
- Add Populator (when adding new populators): Click this button to save settings for the new populator and exit the dialog.
- Save (when editing existing populators): Click this button to save changes to populator settings and exit the dialog.
Notes:
- The Populator dialog is visible only to users whose level is Administrator.
- Populators can also be added and edited with the Custom Dimension API (only applies to manually created dimensions).

Populator Fields
| Note: This topic applies only to manually-created dimensions. |
Manually created populators are defined with a set of fields on the tabs of the Populator dialog. The following topics cover working with those fields:
Populator Field Definitions
Manually created populators for a given custom dimension are defined with the fields on the tabs of the Populator dialog, which are described in the following topics. The validation columns in each table below indicate whether or not the following validations will be applied to a given populator field:
- Comma: Comma-delimited list
- Database: Database patterns (e.g. % and _)
- Regex: Regex
Note: For additional information on validation of populator field values, see Populator Field Validation.
General Populator Settings
| Field | Description | Comma | Database | Regex |
| Value | Required: The value placed in the custom column when there's a match with the ANDed populator parameters below. • When the custom dimension type is "string": - Valid characters: alphanumeric, spaces, dashes, underscores. - Length: min=1, max=128. • When the custom dimension type is "uint32" - Valid values: min=0, max=4294967295. |
No | No | No |
| Direction | Required: The direction (source, destination, or either) of the flow fields in which to look for a match with the populator parameters below. | N.A. | N.A. | N.A. |
Populator Device Matching
| Field | Description | Comma | Database | Regex |
| Device name | Results in a match if this value appears within the name of a device or equals the IP address of a device that has been configured to send flow records to Kentik. | Yes | Yes | No |
| Device Type | Type of device to match (router, host, etc.; see Supported Device Types). | Yes | No | Yes |
| Site | Results in a match if this value appears within the name of a site to which the device sending the flow record to Kentik has been assigned (see About Sites). | Yes | No | Yes |
| Interface name/description | Results in a match if this value appears within the name or description of a source or destination interface. | Yes | Yes | Yes |
Populator IP Matching
| Field | Description | Comma | Database | Regex |
| IP address (IP/CIDR format) | Expressed in IPv4 or IPv6 CIDR notation (e.g. 38.12.34.0/24; see CIDR Notation), this value will result in a match if it corresponds to a range of IP addresses in the flow, either source (SRC IP) or destination (DST IP). | Yes | No | No |
| Port | Results in a match if this value appears within a port number in the flow, either source (SRC Port) or destination (DST Port). | Yes | No | No |
| TCP flag | An integer number between 0 and 255 representing an 8-bit binary bit pattern. At ingest this pattern is used as a bitmask that is ANDed with the composite (ORed) bit pattern of the TCP flags set in the flow. A match will result if the value in both the flow bit pattern and the bitmask is 1 at any of the eight places. | No | No | No |
| Protocol Number | Results in a match if this value is the same as the protocol of the traffic represented by the flow. The protocol of TCP is 6, and of UDP is 17. | Yes | No | No |
Populator BGP Matching
| Field | Description | Comma | Database | Regex |
| Last-hop (origin) ASN | Results in a match if this value is the same as the last ASN (16- or 32-bit) in the path in the routing table for either the source (SRC IP) or destination (DST IP). | Yes | No | No |
| Last-hop (origin) AS Name | Results in a match if this value represents the name corresponding to the last ASN in the path in the routing table for either the source (SRC IP) or destination (DST IP). | Yes | No | Yes |
| Next-hop ASN | Results in a match if this value is the same as the ASN (16- or 32-bit) of the next hop router based on AS path. | Yes | No | No |
| Next-hop AS Name | Results in a match if this value represents the name corresponding to the ASN of the next hop router based on AS path. | Yes | No | Yes |
| Next-hop IP | If a CIDR grouping (IPv4 or IPv6) is specified, a match can be on any address within that grouping. If no CIDR grouping is specified a match requires an exact IP. - CIDRs may be expressed in "short form" (e.g. 1::2/127). |
Yes | No | No |
| BGP AS Path | Results in a match if this value is the same as the BGP AS path in the route (see Specifying BGP Fields). | Yes | No | Yes |
| BGP Community | Results in a match if this value is the same as the BGP community of BGP route. May be specified with a form of regex (see Specifying BGP Fields). | Yes | No | Yes |
Populator UDR
| Field | Description | Comma | Database | Regex |
| Device Type | A dropdown to select a device type for the matching criteria. | N.A. | N.A. | N.A. |
| Various | Fields that vary depending on the selected device type. Results in a match if the values in the fields match to a flow field. | N.A. | N.A. | N.A. |
Other Populator Settings
| Field | Description | Comma | Database | Regex |
| MAC Address | Results in a match if this value matches source or destination Ethernet (L2) address. | Yes | No | No |
| Country | Results in a match if this value includes a two-letter country code associated with the source or destination IP of the flow. | Yes | No | No |
| VLAN(s) | Results in a match if this value includes a VLAN ID associated with the source or destination IP of the flow. | Yes | No | No |
Populator Field Validation
The following general considerations apply to the validation of values in the populator fields described in Populator Field Definitions:
- Some fields support the entry of multiple values as a comma-delimited list (see tables above).
- Commas are supported only as list delimiters (not in actual values or regex).
- Some fields support the use of database patterns (see tables above).
- In fields where regex is supported (see tables above), a period (".") may be used in place of a comma.
- The BGP AS Path and BGP Community fields use PostgreSQL POSIX Extended Regular Expressions. For additional information, see Specifying BGP Fields.
- All other fields that support regex use PostgreSQL Advanced Regular Expressions.
Note: Documentation for PostgreSQL regex and database patterns can be found at PostgreSQL documentation:
- Database patterns are documented under "9.7.1. LIKE."
- Regular expressions are documented under "9.7.3. POSIX Regular Expressions."
Specifying BGP Fields
Matches on the BGP-related populator fields (see the BGP Matching section of the table in Populator Field Definitions) are made on substrings. For ASN and Next Hop ASN, the string(s) to match are specified in a simple comma-delimited list. For both the BGP AS Path and BGP Community fields the specified values are also evaluated using a subset of standard regex (see table below):
- BGP AS path: Entering "10" in the as-path field will match any path that includes "10", "100", "010", etc. Using regex, a value of "_10_" will match only paths that include ASN 10, including "10 ", " 10", and " 10 ". Also allowed are tags where as-path is specified as, for example, "_10 100_".
- BGP Community: Matches on communities are similar to matches on AS paths except that they also support the use of regex periods. This allows you to specify, for example, "2000:1…." to find any flow with community 2000:1xxxx in it.
The following table shows the regex special characters that are supported when specifying the BGP AS Path and BGP Community:
| Special Character | Matches |
| _ (underscore) |
start of string end of string " " (space) |
| . | Any single character, including white space. |
| [ ] | The characters, or a range of characters separated by a hyphen, contained within square brackets. |
| ' | The character or null string at the beginning of an input string. |
| ? | Zero or one occurrence of the pattern containing the question mark. |
| $ | End of string. |
| * | Zero or more sequences of the preceding character. Also acts as a wildcard for matching any number of characters. |
| + | One or more sequences of the preceding character. |
| () | Used for nesting of expressions. |
Note: For BGP community and AS path, any spaces at the beginning or end of the input field and also before and after each comma will be removed.
Manage Custom Dimensions
Custom dimensions are added and edited via the Custom Dimensions page. The add/edit process is documented in the following topics:
Note: Manually added custom dimensions can also be added and edited with the Custom Dimension API.
Add a Custom Dimension
A custom dimension may be added either manually or automatically (using previously defined AWS or Azure tags; see Auto-Generated Dimensions).
Manual Custom Dimensions
In the Kentik portal:
- Choose Settings from the Kentik navbar, then Custom Dimensions under Data Enrichment.
- Click the Add Custom Dimension button at the upper right, which opens the Create Custom Dimension dialog.
Note: If your organization has already reached its limit of custom dimensions (see Dimension and Populator Limits), the Add Custom Dimension button will be grayed out, and you will not be able to add any custom dimensions without first deleting one or more existing custom dimensions. - Select Manual, then click Next.
- Enter the Dimension Name, Type, and Display Name for the new custom dimension.
Note: After the custom dimension is created, neither the Dimension Name nor the Type will be editable. - Click the Save button. The dialog will close and the new dimension will appear as a row in the Custom Dimensions List.
The new custom dimension is saved with no populators. This allows you to create views, dashboards, and alerts around a dimension before you have defined populators for that dimension. Used as a group-by dimension or filter, a custom dimension without populators will function essentially the same as the standard dimension FULL:Total (all traffic). To add one or more populators to the custom dimension, see Manage Populators.
Automatic Custom Dimensions
In the Kentik portal:
- Choose Settings from the Kentik navbar, then Custom Dimensions (under Data Enrichment).
- Click the Add Custom Dimension button at the upper right, which opens the Create Custom Dimension dialog.
Note: If your organization has already reached its limit of custom dimensions (see Dimension and Populator Limits), the Add Custom Dimension button will be grayed-out, and you will not be able to add any custom dimensions without first deleting existing dimensions. - Select Automatically using AWS tags or Automatically using Azure tags, then click Next.
- Select the AWS or Azure Entity keys from which you'd like to create a custom dimension, then click Next.
- Select the AWS or Azure tags from which you would like to generate custom dimension columns that you can use for group-by and filtering in queries.
- Click Save to close the dialog. The new dimension will appears as a row in the Custom Dimensions List. The Kentik system will then begin to generate the populators from your AWS or Azure tags, which may take up to 30 minutes.
Edit a Custom Dimension
To edit a custom dimension:
- Choose Settings from the Kentik navbar, then Custom Dimensions under Data Enrichment.
- In the Custom Dimensions List, click the Edit icon (pencil) on the row of the custom dimension that you'd like to edit. The Custom Dimension dialog will open.
- Edit the custom dimension:
- To change the name you see for the custom dimension in the Kentik portal, enter a new name in the Display Name field on the General tab.
- To add a populator to the custom dimension, see Add a Populator.
- To edit an existing populator, see Edit a Populator.
- To remove a populator from the custom dimension: in the Populator List, click the Remove button (trash icon) in that populator's row.
Note: When a populator for a custom dimension is removed, the KDE main table rows that were previously matched by that populator will no longer be filterable by the populator's value. - To save changes to the custom dimension, click the Save button.
Manage Populators
| Note: This topic applies only to manually-created dimensions. |
The populators of an existing manually created custom dimension can be added to or edited in the Custom Dimension dialog as described in the following topics:
Note: Populators of manually created custom dimensions can also be added and edited with either the Custom Dimension API or the Batch API.
Add a Populator
Populators are added to a manually created custom dimension from within the Custom Dimension dialog. To add a populator :
- Go to the Populators tab of the dialog.
- Click the Add Populator button at the upper right, which opens the Populator dialog.
- Specify values for the populator’s settings (see Populator Field Definitions).
- Click the Add Populator button to add the populator to the custom dimension. The Populator dialog will close, returning you to the Custom Dimension dialog, where you'll now see the added populator in the Populator List.
- Click the Save button to save the changes to the custom dimension.
Note: If you add two or more populators whose Dimension value (see Populator Field Definitions) is the same, then those populators will be ORed (e.g. if the protocol value of one is 6 and the other is 17 then a protocol value of either 6 or 17 will result in a match), which allows the creation of more complex populators.
Edit a Populator
Existing populators of manually created dimensions may be edited from the Custom Dimension dialog (see Edit a Custom Dimension). To edit a populator:
- On the Populators tab of the Custom Dimension dialog, click the Edit icon in the row of the populator that you want to edit. The Populator dialog will open.
- Edit the populator fields that you wish to change (see Populator Field Definitions).
- Click the Save button to save changes to the populator. The Populator dialog will close, returning you to the Custom Dimension dialog.
- Click the Save button to save the changes to the custom dimension.
Regenerate Populators
Automatically created custom dimensions use AWS or Azure tags to generate populators. Any time you update or create a tag in AWS or Azure, you’ll need to regenerate the populators of any custom dimension that includes populators based on that tag.
To regenerate a dimension's populators:
- Go to the Populators tab of the Custom Dimension dialog.
- Click Regenerate Populator. The dialog will automatically close and the following confirmation message will appear at the top of your screen:
“Populators were successfully queued for regeneration. It might take approximately 30 minutes for data to refresh.”