Saved Views
Saved views, which are viewed in the Library section of the Kentik portal, are covered in the following topics:
- About Saved Views
- Saved View Page
- Saved Views Sidebar
- Saved View Query Sidebar
- Saved View Dialogs
- Manage Saved Views

About Saved Views
A saved view is a look at traffic using a saved collection of query settings in the sidebar (see Query Sidebar Controls). Saved views may be created from the following locations:
- Data Explorer: Choose Create Saved View from the Actions menu (see Create Saved View). The view will represent the state of Data Explorer at the time that view is saved.
- Library: Choose Saved View from the drop-down Add New button. The view will initially represent the default state of a new instance of Data Explorer. Use the controls of the Query sidebar to tailor the settings for the new view.
Either of the above actions will open the Add Saved View dialog, where you'll set the properties of the view (see Saved View Properties), then click Save to create the new view. Once created, saved views are accessed and managed via the Library (choose Library from the main portal menu), where they can either be viewed and shared directly or added as panels to dashboards.
Saved View Visibility
Saved View visibility determines which users have access to a given saved view:
- Private: Views that you save only for your own personal use. No one else has access.
Note: In the Library, Private saved views are indicated with an eye icon in the Sharing column of the Library list (see Library List Columns). - Shared: Views saved by any user in your organization. All users in your organization have access.
Saved View Page
The pages for individual saved views in the Library are covered in the following topics:
Saved View Access
A saved view is accessed by clicking the view's name in its row of the Library List.
Saved View Layout
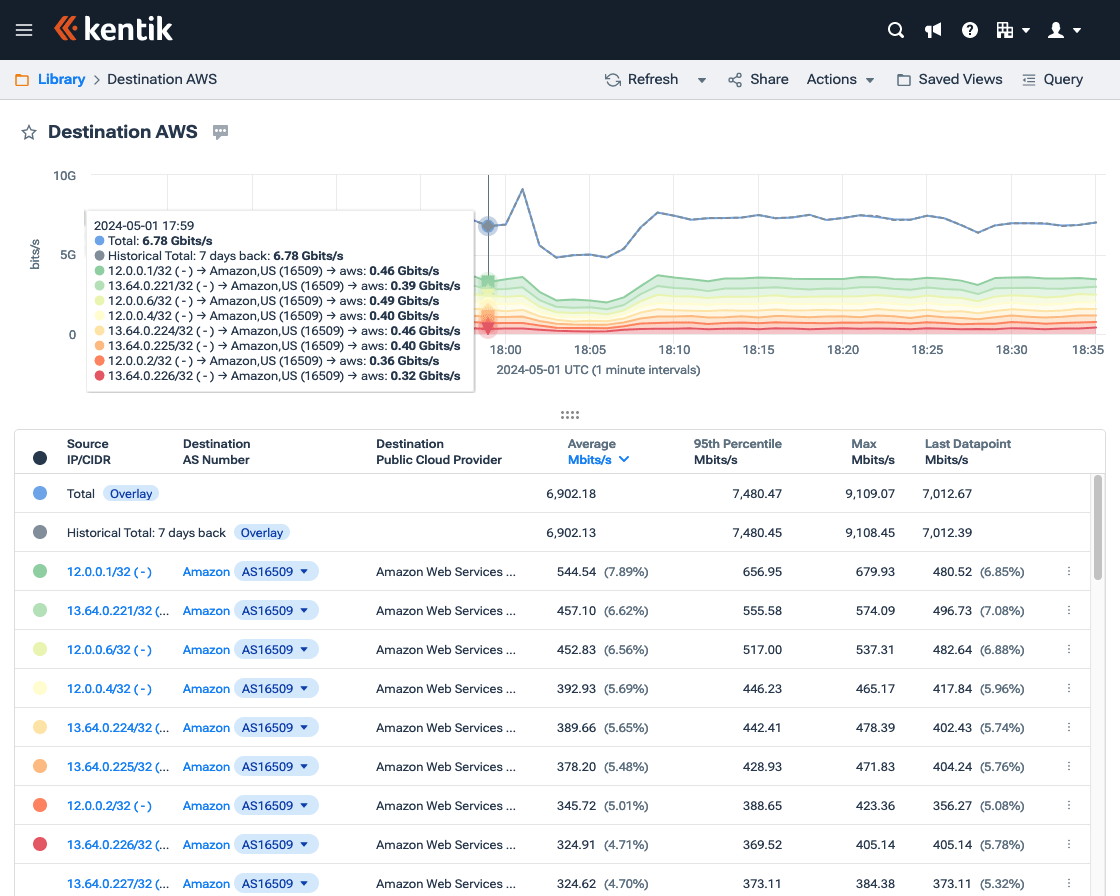
The layout of a saved view page is effectively the same as a page in Data Explorer, with the following main areas (including differences as noted):
- SubNav controls: Page-wide controls in the SubNav (see Saved View SubNav Controls).
Note: The options on the Actions menu are specific to saved views (see Saved View Actions). - Title bar: An area just below the SubNav with the name of the saved view and various other information (see Saved View Title Bar)
- Main display: An area for display of query results, which in most cases is made up of a visualization (see Data Explorer Chart) and an accompanying table (see Data Explorer Table).
Note: On a saved view page a Favorite icon appears to the left of the view's title, enabling you to add the view to the Library's Favorites Tab. - Query sidebar: A right-side sidebar that opens from the Query button in the SubNav and contains the settings used to define the view's properties (see Saved View Properties) and query (see Query Sidebar Controls).
The SubNav (silver strip across top of page) contains the following page-wide controls:
- Refresh: A button that updates the charts and tables in the dashboard's panels.
- Auto Update (down-pointing triangle icon): A drop-down menu from which you can set auto-update to Off (default) or select an interval at which the charts and tables will automatically update:
- When auto-update is on, the interval (60, 90, or 120 seconds) will be displayed in the SubNav to the left of the down-pointing triangle.
- When auto-update is set to Off, the down-pointing triangle will be displayed alone (no auto-update indicator).
Note: The countdown to refresh starts over each time you apply changes and the new result is returned in the display area. - Share: A button that opens the Share dialog to enable you to share the current dashboard (see Sharing via the Share Dialog).
- Actions: A drop-down with the options covered in Saved View Actions.
- Saved Views: A button that toggles visibility of the right-side Saved Views Sidebar, which enables you to link directly to other saved views in your organization.
- Query: A button that toggles visibility of the right-side Query sidebar, which contains the settings used to define the view's properties (see Saved View Pane Properties) and specify its query (see Query Sidebar Controls).
Saved View Title Bar
The title bar in Data Explorer includes the following information:
- Favorite (star icon): An icon indicating whether the saved view is favorited. Click the icon to add or remove the designation as a favorite.
- Title: The title of the graph returned from the query specified with the Query Sidebar Controls.
- Trending (flame icon): An indicator that the dashboard/saved view is trending (among the top 10 most-visited dashboards or saved views over the last month).
- Description: A description of the saved view, if any was added at creation or during editing.
- Labels: The labels, if any, currently applied to the saved view.
Saved View Actions
The Actions menu on an individual saved view page is nearly but not exactly the same as the context menu in a saved view row in the Library list. The menu includes the following options:
- Export: Opens a submenu from which you can choose among various forms in which the saved view can exported (see Portal Export Options).
- Subscribe: Opens the Subscribe dialog enabling you to create a subscription for this saved view. The form in the Subscription dialog is the same as on the Subscription tab of the Share dialog, which is covered in Subscription Tab UI.
- Unsubscribe: If you’re subscribed to this saved view, this option opens a dialog enabling you to confirm that you wish to be removed from the subscription.
- Add to Observation Deck: Add the view to your Observation Deck.
- Add To New Dashboard: Opens the Add Dashboard dialog (see Dashboard Dialogs), enabling you to create a new dashboard to which you can add this saved view as a panel.
Note: A dashboard panel created from a saved view is completely independent of that saved view, and modifications to one will have effect on the other. - Add To Existing Dashboard: Opens the Add Data Explorer View Panel dialog, where you can specify the dashboard to which this saved view will be added as a panel.
Note: See note above. - Preview as Tenant (only present in accounts that use My Kentik Portal): Opens a submenu from which you can choose an MKP tenant, after which you'll be taken to the saved view as it would appear to that tenant.
- Show API Call: Provides access to a set of dialogs that contain code (cURL or JSON) that can be used to return the current view (content of the display area) from the Kentik Query API. See Show API Call.
- Remove: Opens a confirmation popup that enables you to remove the saved view from your organization.
Saved Views Sidebar
The Saved Views sidebar is covered in the following topics:
- About the Saved Views Sidebar
- Saved Views Sidebar Filters
- Saved Views Sidebar Tabs
- Saved Views Sidebar List
About the Saved Views Sidebar
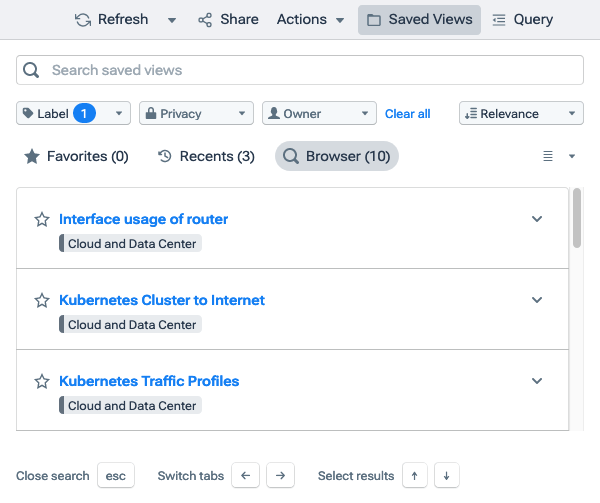
The Saved Views sidebar allows you to directly browse, search, and find other saved views without going back to the Library page. The sidebar includes filter controls, tabs, and a list of your organization's saved views (see Saved Views Sidebar List), which you can expand/collapse by clicking the hamburger icon at its top right corner. When your browser width is less than 1760 pixels the sidebar displays as a drawer.
Note: The following supported keyboard shortcuts are listed at the bottom of the sidebar:
- Close: Use the esc key to close the sidebar.
- Switch tabs: Use the left/right arrow keys to toggle between the Favorites, Recents, and Browser tab.
- Select results: Use the up/down arrow keys to select the previous/next saved view in the list.
Saved Views Sidebar Filters
The following controls are used to filter the Saved Views list:
- Search: A field that filters the Saved Views list to saved views whose title matches the entered text.
- Label: A filterable drop-down from which you can select one or more labels. The Saved Views list will be filtered to saved views with the selected labels.
- Privacy: A drop-down in which checkboxes will include/exclude saved views from the Saved Views list based on their sharing setting (if none are checked then no sharing settings are excluded):
- Shared: Saved Views that you or others in your organization have designated for use by everyone in the organization.
- Private: Saved Views that you own and have designated for your own exclusive use (no one else has access).
- Kentik Preset: Saved Views created by Kentik. - Owner: A filterable drop-down in which checkboxes will include/exclude owners from the Saved Views list (if none are checked then no owners are excluded).
- Clear all: A link that clears any filters set by the above controls.
- Sort: A drop-down to select the sorting criteria for the Saved Views list: Relevance, Name, Created Date, or Last Updated.
Saved Views Sidebar Tabs
The following tabs determine which subset of saved views is displayed on the Saved Views list:
- Favorites: A tab to display saved views marked as favorites, with a numerical count of the search results for tab.
- Recents: A tab to display most recently viewed saved views, with a numerical count of the search results for the tab.
- Browser (default): A tab to display all saved views you have access to, with a numerical count of the search results for the tab.
Saved Views Sidebar List
The Saved Views list contains expandable rows, each representing one saved view, that contain the following elements:
- Favorite (star icon): An icon indicating whether the saved view is favorited. Select the icon to add or remove the saved view from Favorites.
- Name: A link to the saved view.
- Labels: A list of labels applied to the saved view.
- Description (when row is expanded): The optional description of the saved view.
- Owner (when row is expanded): The user who created the saved view.
- Expand/Collapse: Toggles between expanded and compact view.
Saved View Query Sidebar
For saved views the Query sidebar includes two distinct sets of controls:
- Saved view properties: The Saved View pane of the sidebar contains a set of controls and editable fields for the properties of the saved view (see Saved View Pane Properties).
Note: This pane is not present for saved views that are Kentik Presets. - Query settings: The controls used to specify the query whose results are returned in the display area. These query settings are detailed in Query Sidebar Controls.
Saved View Pane Properties
The following controls in the Saved View pane of the Query sidebar may be used to edit view properties:
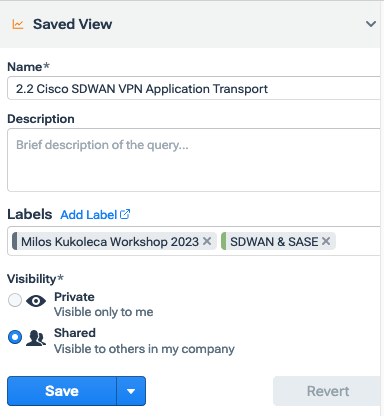 Name: A field for the name that will represent this saved view in the title and the Library List.
- Description: An optional field for the description of the saved view.
- Labels: An optional set of controls to add and apply labels to the saved view (see Labels Controls).
- Visibility: A set of radio buttons to set the Saved View Visibility.
- Save: A button that saves changes to the saved view properties.
- Save As: A button (down-arrow at right of Save button) that opens the Create Saved View dialog (see About Saved View Dialogs) so you can save the current settings of the saved view as a new view.
- Revert: A button that restores all properties to their values before any changes.
Saved View Dialogs
The dialogs used to set the properties of a saved view are covered in the following topics:
About Saved View Dialogs
The properties of saved views are managed in a settings dialog. The dialog has the following two versions:
- Add Saved View: A dialog used to define the properties of a new saved view. This dialog is opened when you first create a saved view (see Create a View).
- Create Saved View: A dialog used to define the properties of a view that you're saving as a variant of an existing view. This dialog is opened when choose Save As in the Saved View pane of the Query sidebar (see Saved View Properties).
- Edit Saved View: A dialog used to modify the properties of an existing saved view. The dialog opens from the Edit Properties option on the Library Action Menu.
Note: Properties are not editable for saved views that are Kentik Presets, but presets may be cloned and edits made to the resulting copy.
Saved View Dialogs UI
The property settings dialogs for saved views share the same layout and the following common UI elements:
- Information (Add Saved View dialog only): An information pane that provides a brief description of a saved view.
- Name: A field for the name that will represent this saved view in the Library List.
- Description: An optional field for the description of the saved view.
- Labels: An optional set of controls to add and apply labels to the saved view (see Labels Controls).
- Visibility: A set of radio buttons to set the Saved View Visibility.
- Add Saved View (Add Saved View dialog only): A button that creates the new saved view and exits the dialog.
- Save (Edit Saved View dialog only): A button that saves changes to the existing saved view and exits the dialog.
- Cancel: A control — either the X at the upper right or the Cancel button at the lower right — that exits the dialog while leaving all settings as they were when it was opened.

Saved View Properties
The properties of a saved view are set with the fields and controls of the Add Saved View dialog when a view is first created (see Create a View), and may be subsequently changed in the Edit Saved View dialog (see Edit a View). The properties are described in the following table:
| Field | Type | Description |
| Name | Field | Required: A user-specified descriptive name for the view. |
| Description | Field | Optional: Any text added by the user to explain the characteristics and utility of the view. Note: The more informative your description is, the easier it will be for team members to determine how the view might be useful. |
| Labels | Drop-down menu | Optional: Choose an existing label to be applied to the view in the Library, or create a new label to which the view should be assigned (see New Label Dialog). |
| Visibility | Radio buttons | Required: One of the following, which determines who has access to the view: - Private: view will be available only to you. - Shared: view will be available company wide. |
Note: Saved view properties can also be set and edited in the Saved View pane at the top of the Query sidebar on a saved view page (see Saved View Properties).
Manage Saved Views
The management of Saved Views is covered in the following topics:
Create a View
A view can be saved directly from Data Explorer (see Create Saved View), or a "blank" view can be created with the Add New button in the Library (see Library Page) and configured later.
To create a saved view:
- Start in either Data Explorer or the Library:
- In Data Explorer, choose Create Saved View from the Actions menu in the SubNav.
- In the Library, choose Saved View from the drop-down menu on the Add New button. - In the resulting Add Saved View dialog, specify the properties of the view (name, description, etc.) in the fields described in Saved View Properties.
- Click the Add Saved View button to save the new view and return to where you started (either Data Explorer or the Library). A notice will appear indicating that the view has been saved. If you're in Data Explorer, the title bar of the graph will now include a “Saved View” label.
Load a View
A saved view is displayed on an individual saved view page within the Library. To open a saved view page, click on the view's name in its row in the Library List.
Edit a View
Either a view itself (e.g. query settings in the sidebar) or the properties of that view (e.g. description) can be edited.
Edit View Properties
To edit a saved view’s properties (name, description, or sharing settings):
- In the Library, click the Action menu (vertical ellipsis) at the right of the view's row in the Library List, then choose Edit Properties from the menu.
- In the resulting Edit Saved View dialog, edit the properties of the view (see Saved View Properties).
- Click the Save button to save the edited properties and return to the Library. A notification will confirm that the edited properties were saved.
Edit View Query
To edit a view’s query and display settings:
- In the Library, find the card for a saved view in a views list, then click on the name of the saved view, which will take you to the page for that view.
- In the SubNav, click the Options button, which will open the right sidebar and enable you to change the saved view's query settings (see Query Sidebar Controls), including view type, data sources, dimensions, filtering, etc..
- Once you've made changes, you have three options:
- Save: If you'd like to keep the changes to this saved view, click the Save button. A popup notification will confirm that the changes have been saved.
- Save as...: If you'd like to keep this saved view as it was when opened but save the current (changed) settings to a new saved view, click the down-triangle on the Save button and choose Save as.... A Create Saved View dialog will open, enabling you to specify Saved View Properties. When you click Save in the dialog you'll be taken to the newly created saved view.
- Revert: If you don't want to save your changes at all, click the Revert button. All settings will revert to the values they had when the saved view was last saved.